Scented Candle Manufacturer & Supplier


How to Burn a Candle Properly?
Lighting a candle is simple, but achieving a perfect, clean, and safe burn is a skill. Many common issues—like wasted wax, weak scent, and black soot—are actually the result of improper technique. Learning how to burn a candle properly is the key to unlocking its full potential.
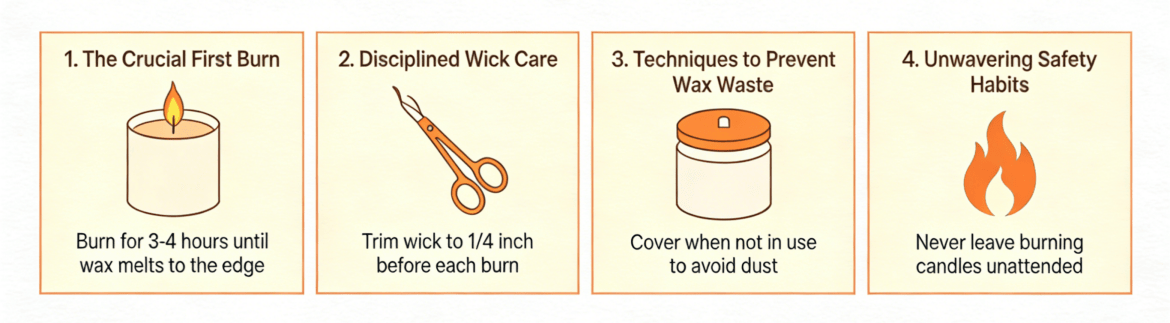
To burn a candle properly, you must master four essential practices: the crucial first burn, disciplined wick care, techniques to prevent wax waste, and unwavering safety habits. Together, these steps ensure maximum fragrance, longevity, and safety.
Many people ask, “How do I burn a candle properly?” The answer is simpler than you think. Let’s break down the process into clear, actionable steps.
1. The First Burn: Setting the Candle’s “Memory”
The most important lesson in how to burn a candle properly starts with the very first lighting. This session creates the candle’s “memory,” determining its burn pattern for its entire life.
To burn a candle properly from the start, you must let the first burn last long enough for the melted wax to form a complete, even layer that reaches every edge of the container. This prevents tunneling and sets the stage for an even burn.
The One-Hour-Per-Inch Rule
A simple, foolproof guideline shows you how to burn a candle properly on the first try. Allow the candle to burn for one hour for every inch of its container’s diameter.
| Container Diameter | Minimum First Burn Time |
|---|---|
| 2 inches | 2 hours |
| 3 inches | 3 hours |
| 4 inches | 4 hours |
Crucially, never burn any candle for more than 4 hours at a time, even on the first use, to prevent overheating.
Why This Step is Non-Negotiable
If you extinguish the candle too early, only the wax around the wick melts. The candle then “remembers” this narrow burn path and will continue tunneling straight down, leaving hard, unused wax on the sides. This wastes up to half the wax and ruins the fragrance throw. Mastering this first step is the core of how to burn a candle properly.
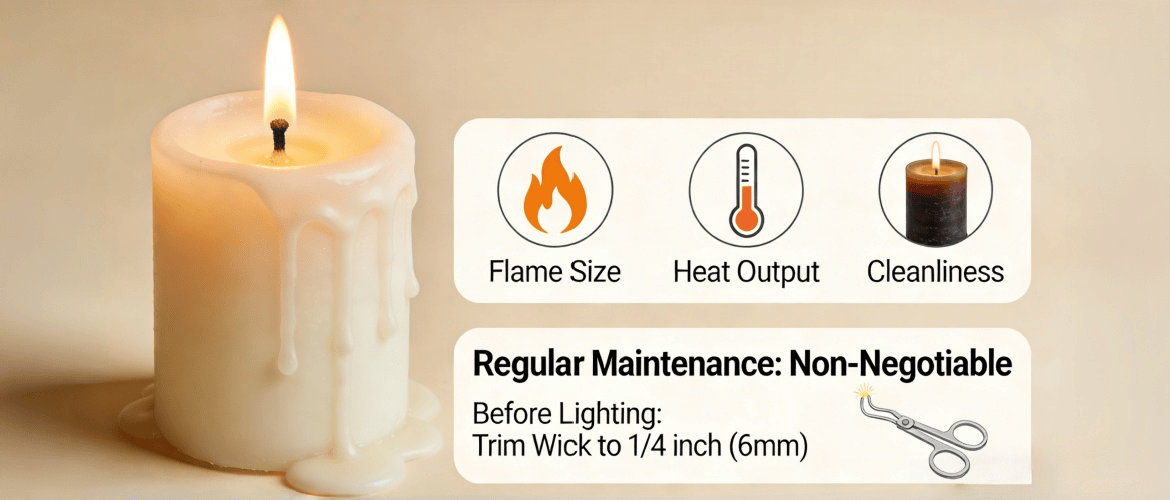
2. Wick Care: The Engine of a Clean Burn
The wick controls everything: flame size, heat output, and cleanliness. Regular maintenance is non-negotiable when learning how to burn a candle properly.
Before every single lighting, trim the wick to ¼ inch (about 6mm). This keeps the flame controlled, minimizes soot, and ensures the wax melts evenly.
The Danger of a Long Wick
An untrimmed wick creates a tall, flickering flame. This leads to three major problems:
- Excessive Soot: Black smoke that stains jars and walls.
- Overheating: The jar can crack, and wax burns too fast.
- Uneven Burning: The intense heat worsens tunneling.
The Ritual of the ¼-Inch Trim
A wick trimmed to ¼ inch produces a steady, teardrop-shaped flame. This is the ideal balance: enough heat to melt the wax fully without creating smoke. Make this trim part of your pre-light ritual. It is the most impactful habit for anyone learning how to burn a candle properly.
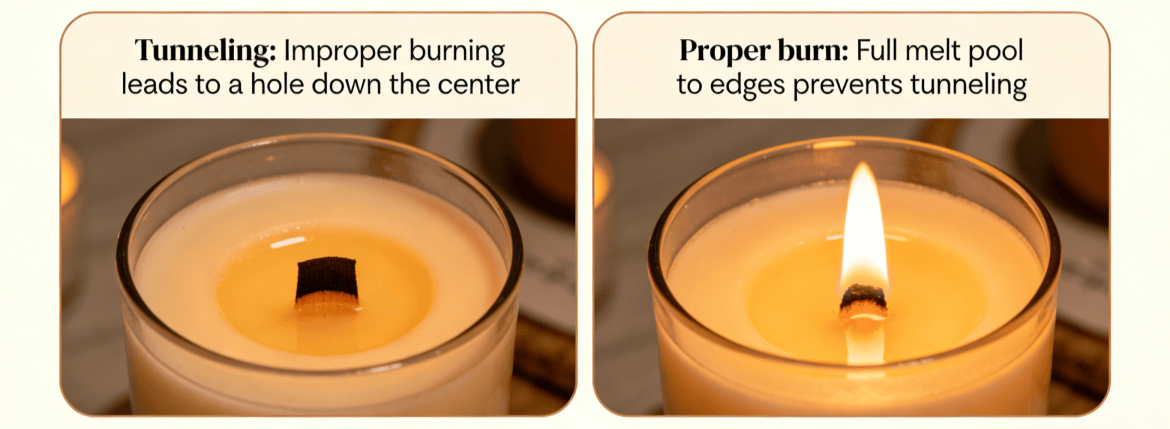
3. Preventing Tunneling: Ensuring Full Wax Use
Tunneling—a hole down the center of the candle—is the clearest sign of improper burning. Preventing it is a primary goal of learning how to burn a candle properly.
To prevent tunneling, every burn session (not just the first) must last long enough to create a full melt pool to the container’s edges. Consistency is key.
Maintaining the Pattern
Your first burn set a good pattern; now you must maintain it. Avoid short, frequent burns. Instead, allow the candle to burn for 2-3 hours at a time so the heat can spread fully. This is a fundamental part of how to burn a candle properly for maximum value.
Your Anti-Tunneling Action Plan
- Burn Long Enough: Plan for sessions of 2-4 hours.
- Trim the Wick: A ¼-inch wick produces the right heat.
- Avoid Drafts: Place the candle in a still location to prevent lopsided melting.
- Use a Level Surface: This ensures an even wax pool.
If tunneling has already started, the “foil method” can help: wrapping foil around the jar to reflect heat and melt the solid wax walls. But prevention is always better than correction.
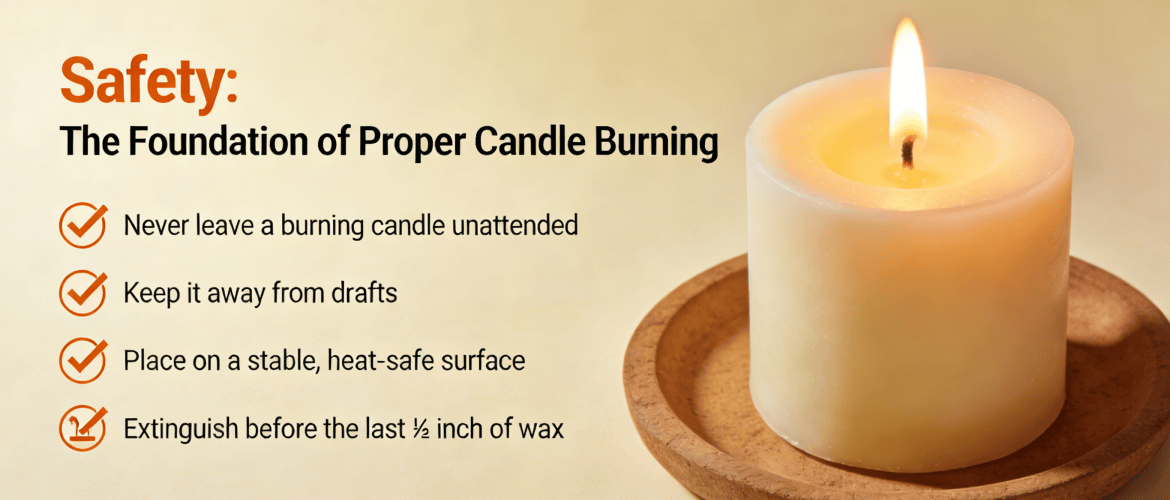
4. Essential Safety for a Perfect Burn
Safety isn’t just about preventing fires; it creates the stable conditions needed for a clean, even burn. You cannot learn how to burn a candle properly without making safety your foundation.
Never leave a burning candle unattended. Keep it away from drafts, on a stable, heat-safe surface, and extinguish it before the last ½ inch of wax. These rules protect you and optimize performance.
The Non-Negotiable Safety Rules
These habits are inseparable from knowing how to burn a candle properly:
- Supervise Constantly: Extinguish the candle if you leave the room or go to sleep.
- Check Clearances: Keep the candle at least 12 inches from anything that can burn.
- Use the Right Surface: Place it on a level, heat-resistant coaster or tile.
- Stop Drafts: Keep away from open windows, vents, or fans to prevent flickering.
- Extinguish Safely: Use a snuffer or dip the wick into the wax to put it out without smoke or splatter.
How Safety Improves the Burn
These rules aren’t just restrictions—they create the ideal environment. A draft-free, stable location allows for that perfect, even melt pool. A proper surface prevents tipping. Extinguishing before the end protects the container. Safety and quality go hand in hand.
Conclusion
So, how to burn a candle properly? The formula is clear and effective. Start with a long, patient first burn to set an even pattern. Maintain that pattern by always trimming the wick to ¼ inch before lighting. Commit to burn sessions long enough to melt the wax fully from edge to edge. And underpin everything with vigilant safety practices. This comprehensive approach to how to burn a candle properly transforms a simple flicker into a refined experience, delivering stronger fragrance, longer life, and beautiful, safe ambiance every time.

