Scented Candle Supplier


How to Fix Candle Tunneling?
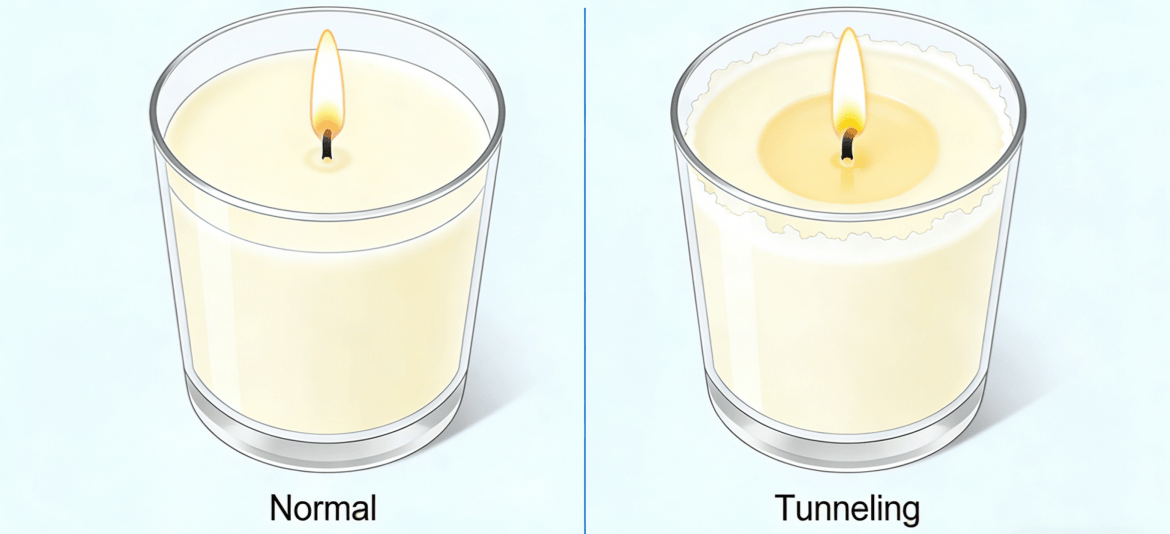
How to Fix Candle Tunneling, a common and frustrating issue where the candle burns straight down the center instead of melting evenly. This leaves a hard wall of unused wax around the container’s edge, wasting wax, weakening the fragrance throw, and shortening the candle’s life.
Fortunately, you can usually fix a tunneled candle and, with better habits, prevent it from happening again. Let’s break down the causes, the quick fix, and the long-term solution.
1. What Causes Tunneling in Scented Candles?
Tunneling isn’t a defect; it’s a burn pattern issue. The problem starts when the melted wax (the “melt pool”) doesn’t reach the container walls during a burn session.
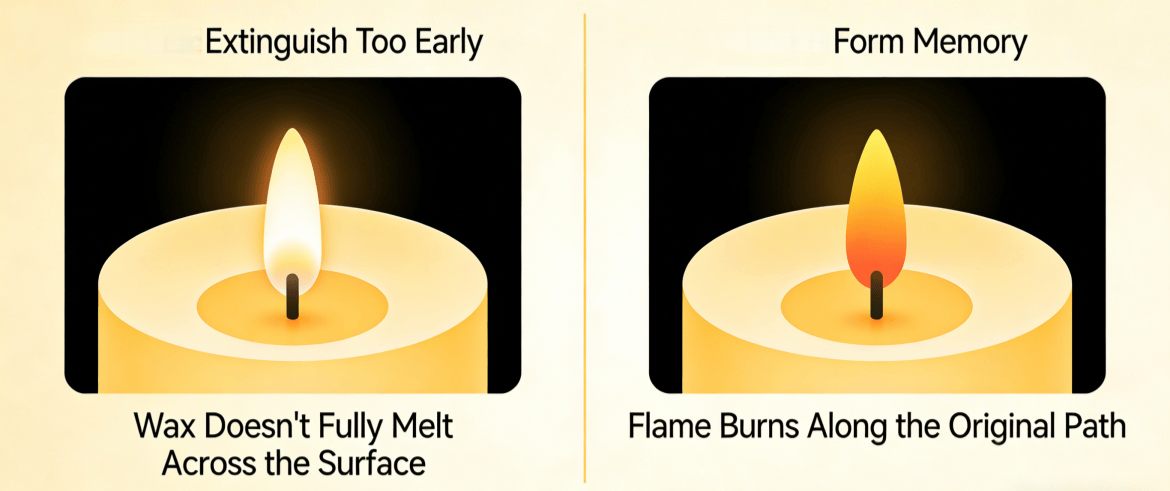
The primary cause of tunneling is insufficient burn time. When you extinguish the candle before the wax melts completely across the surface, it creates a “memory” that encourages the flame to keep burning down that same narrow path.
The Key Culprits
Several factors can lead to that uneven melt pool:
| Cause | How It Leads to Tunneling |
|---|---|
| Short Burn Sessions | The heat doesn’t have enough time to spread outward to the edges. |
| The Crucial First Burn | If the first burn doesn’t create a full melt pool, the candle will “remember” and continue tunneling. |
| A Wick That’s Too Small | A small wick can’t generate enough heat for a wide container. |
| Drafts & Breezes | Moving air makes the flame flicker, focusing heat unevenly on one side. |
| Cool Room Temperatures | The wax near the cold container walls is harder to melt. |
The One-Hour-Per-Inch Rule
A simple guideline can prevent most tunneling from the start. On the first burn, let the candle burn for about one hour for every inch of the container’s diameter. This gives the heat enough time to travel and create a full, even melt pool.
| Container Diameter | Aim for This Burn Time (First Use) |
|---|---|
| 2 inches | 2 hours |
| 3 inches | 3 hours |
| 4 inches | 4 hours |
Important: Never burn any candle for more than 4 hours at a time for safety.
2. How Can the Foil Method Fix Tunneling Quickly?
If your candle is already tunneled, don’t throw it away. The aluminum foil method is a simple and highly effective rescue technique.
The foil method works by reflecting the candle’s heat back onto the solid wax walls, creating a miniature “oven” that melts the tunneled wax evenly to the edges.
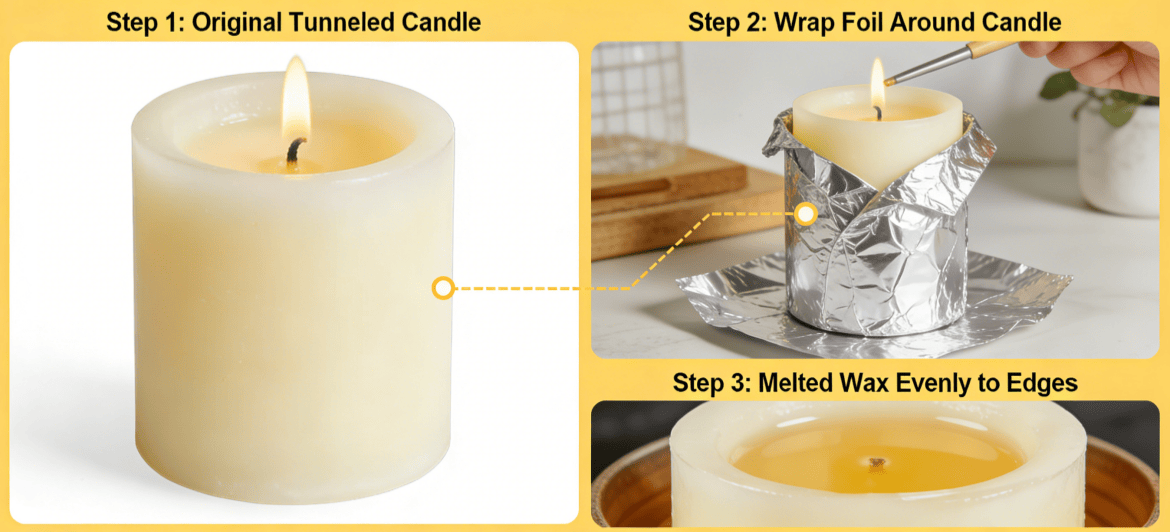
Step-by-Step: The Foil Fix
Follow these steps to save your candle:
- Prepare: Ensure the wick is trimmed to about ¼ inch. Light the candle normally.
- Create a Foil Collar: Tear off a sheet of aluminum foil long enough to wrap around the jar. Wrap it so it extends a few inches above the candle, forming a chimney.
- Secure the Top: Gently fold the top of the foil over the rim of the jar, but leave a small opening (about 1 inch wide) directly above the flame for oxygen.
- Let It Burn: Allow the candle to burn for 2-3 hours. The foil will reflect heat, softening and melting the hardened wax walls.
- Cool and Reset: Once the wax has melted evenly to the edges, extinguish the flame. Let the wax cool and solidify completely (about 4-6 hours) before removing the foil and trimming the wick again.
Safety First: Never leave a burning candle unattended, especially with foil. Ensure the foil does not touch the flame.
When the Foil Method Works Best
- Mild to Moderate Tunneling: It’s very effective for wax walls up to about ½ inch thick.
- Severe Tunneling: It can still help, but may take multiple sessions. For very deep tunnels, the wax may be too far from the wick to melt completely.
3. Does Burn Time Affect Tunneling Problems?
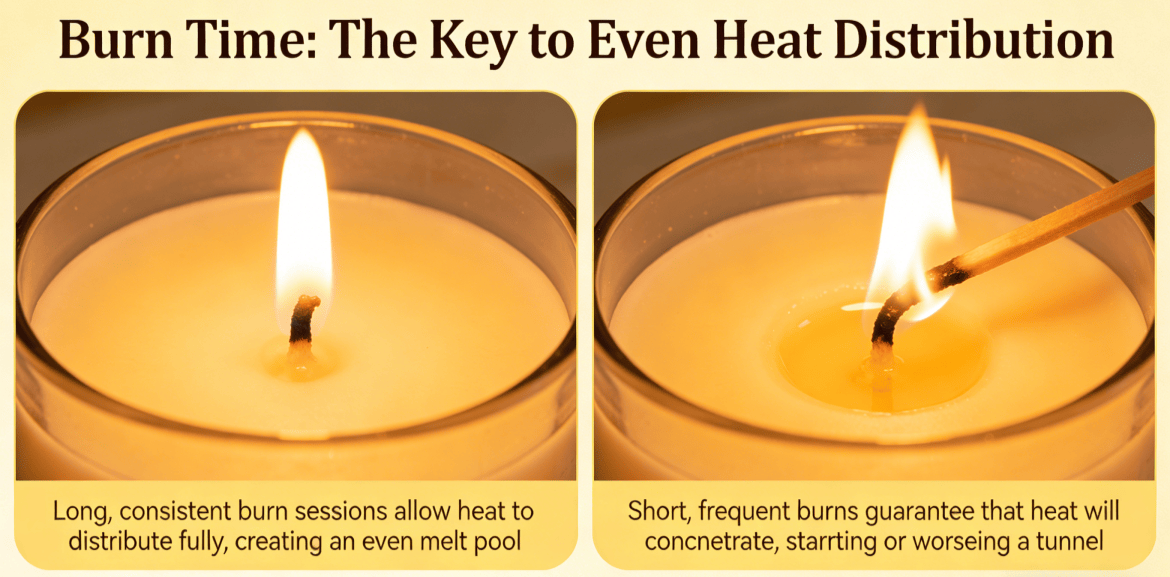
Absolutely. Burn time is the single most important factor you control. It directly determines whether heat spreads evenly or stays concentrated in the center.
Long, consistent burn sessions allow heat to distribute fully, creating an even melt pool. Short, frequent burns guarantee that heat will concentrate, starting or worsening a tunnel.
The Goldilocks Rule for Burn Time
You need a burn session that’s just right: long enough to melt the top layer evenly, but not so long that it risks overheating.
- Too Short: Causes or worsens tunneling.
- Just Right: Melts wax evenly to the edges (typically 2-4 hours).
- Too Long: Can overheat the container, cause excessive smoke, or degrade the fragrance. Stick to a 4-hour maximum per session.
How to Tell if Your Burn Time is Correct
Keep an eye on the melt pool. By the time you blow out the candle, the melted wax should reach, or come very close to, the container’s edges. If you see a ring of solid wax, you need to increase your burn time during the next use.
4. How Can Users Prevent Tunneling in the Future?
An ounce of prevention is worth a pound of cure. Establishing a few simple candle care habits will ensure perfect burns every time and get the most value from your candles.
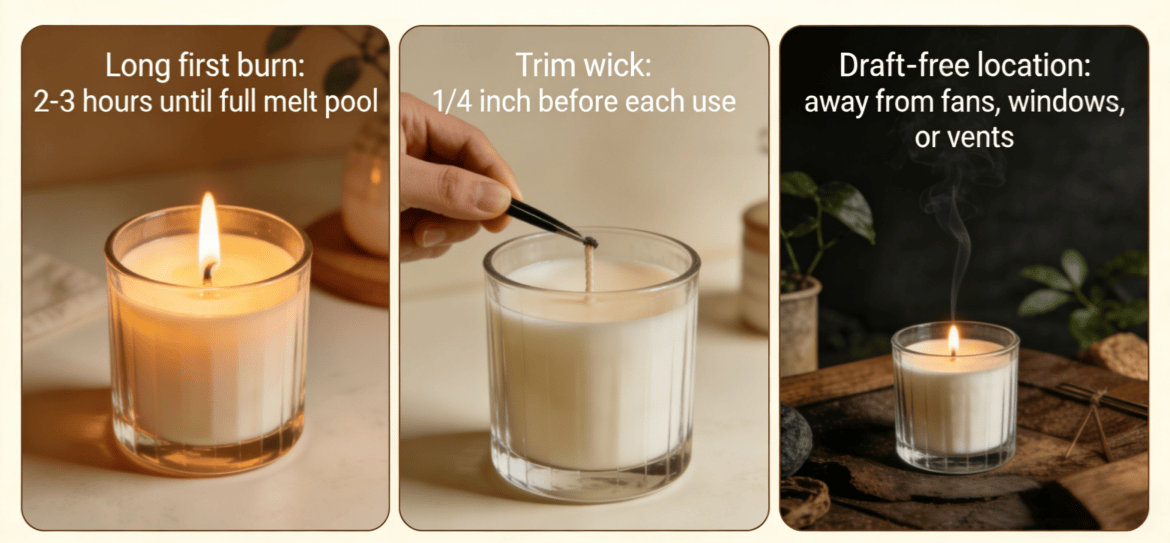
Preventing tunneling is easy: commit to a long first burn, always trim your wick, and burn candles in a still, draft-free location.
Your Candle Care Checklist
Make these three habits your routine:
- Master the First Burn: This is non-negotiable. Always allow the first burn to last long enough to create a full melt pool (use the 1-hour-per-inch guide).
- Trim the Wick Every Time: Before lighting, trim the wick to ¼ inch. A shorter wick gives a cleaner, cooler, and more controlled flame that melts wax evenly without smoking.
- Choose the Right Spot: Burn your candle on a stable, heat-safe surface away from open windows, air vents, fans, or drafts. A steady flame is an even-burning flame.
Putting It All Together: The Perfect Burn Session
- Before: Trim wick, place candle in a draft-free spot.
- During: Light and allow to burn for 2-4 hours, until the melt pool reaches the edges.
- After: Extinguish safely (a snuffer is best), let the wax harden completely, and store in a cool place.
Choosing Candles Wisely
You can also avoid future headaches by selecting candles that are less prone to tunneling. Look for containers with a smaller diameter (easier to melt across) and high-quality wicks that look appropriately sized for the jar.
Conclusion
Candle tunneling is a fixable and preventable problem. You can rescue a tunneled candle using the simple aluminum foil method to redistribute heat and melt the wax evenly. For the future, remember that your habits are key: a long first burn sets the stage, consistent 2-4 hour sessions maintain it, and a trimmed wick in a draft-free spot keeps everything burning perfectly. With this knowledge, you can enjoy every candle to its fullest, getting all the fragrance and burn time you paid for.